کلیدهای میانبر در کتیا
کلیدهای میانبر در کتیا CATIA keyboard shortcuts
برای تسریع گردش کار از کلیدهای میانبر در کتیا CATIA استفاده کنید.
در این مقاله نحوه استفاده از میانبرهای صفحه کلید را در کتیا CATIA V5 نشان داده خواهد شد. چند روش وجود دارد که کاربر قادر به استفاده از کلیدهای میانبر در کتیا است و در اینجا ما تمامی روش ها، ایجاد میانبرهای سفارشی و نحوه اجرای بهتر آن ها را نشان خواهیم داد.
یکی از بهترین راه ها برای افزایش بهرهوری، تسلط بر کلیدهای میانبر در کتیا است. در این مقاله، می توانید برای تعیین دستورات میانبر صفحه کلید در کتیا CATIA، و آنچه را که باید انجام دهید، پیدا کنید.
یکی از کلیدهای میانبر مورد علاقه نویسنده در کتیا CATIA؛ کلید فاصله ( Space ) است، زیرا از این دکمه برای نمایش / پنهان کردن قطعات ( Hide/Show ) استفاده میکند. میانبر دیگر CTRL + SHIFT + C است که برای جمع کردن المان های نمودار درختی است. همچنین، میانبر صفحه کلید استاندارد دیگر آن F3 است که درخت طراحی را نمایش و پنهان میکند.
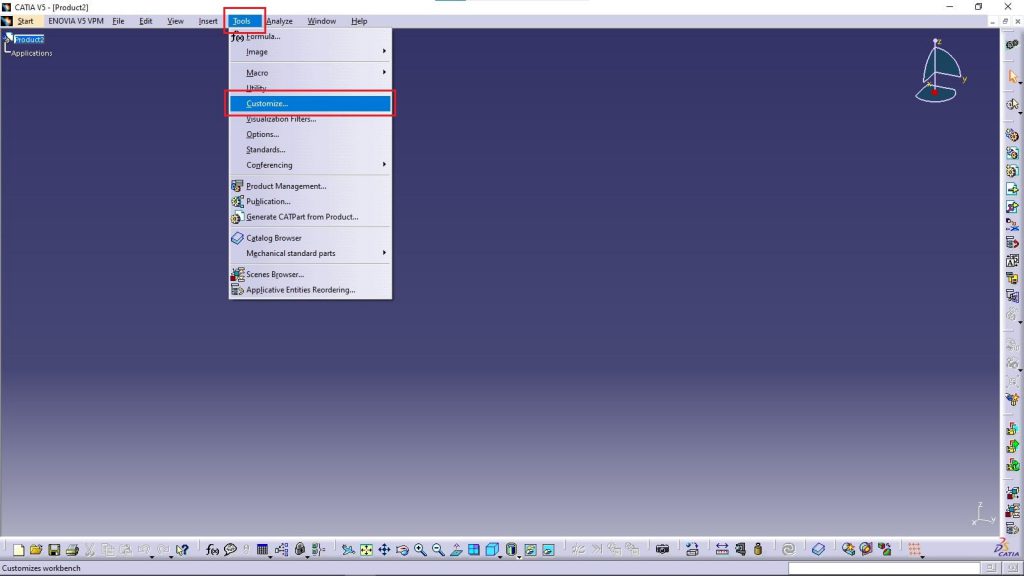
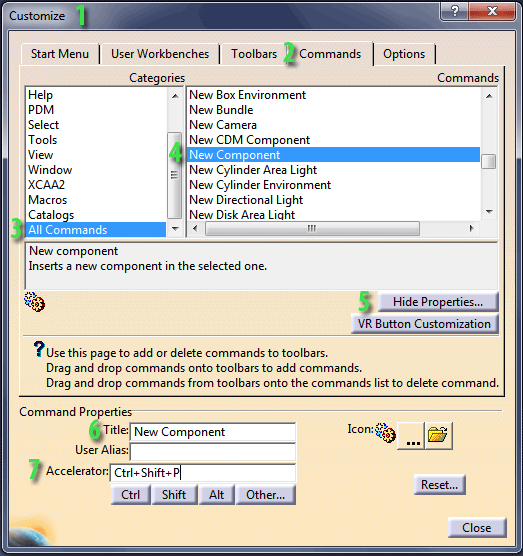
اکنون وقت آن است که به شما نشان دهیم چگونه می توانید کلیدهای میانبر در کتیا را برای پر کاربردترین دستورات تنظیم کنید. برای انجام تنظیمات، باید ابتدا Tools -> Customize را انتخاب کنید. به تب Command بروید، ستون Categories را به پایین کشیده و دستور All Commands را انتخاب کنید. در ستون Commands می توانید تمام دستورات موجود در CATIA را پیدا کنید. اگر نمی دانید نام دستوری چیست، می توانید اشاره گر موس را روی آن حرکت دهید و منتظر ظاهر شدن نام شوید.
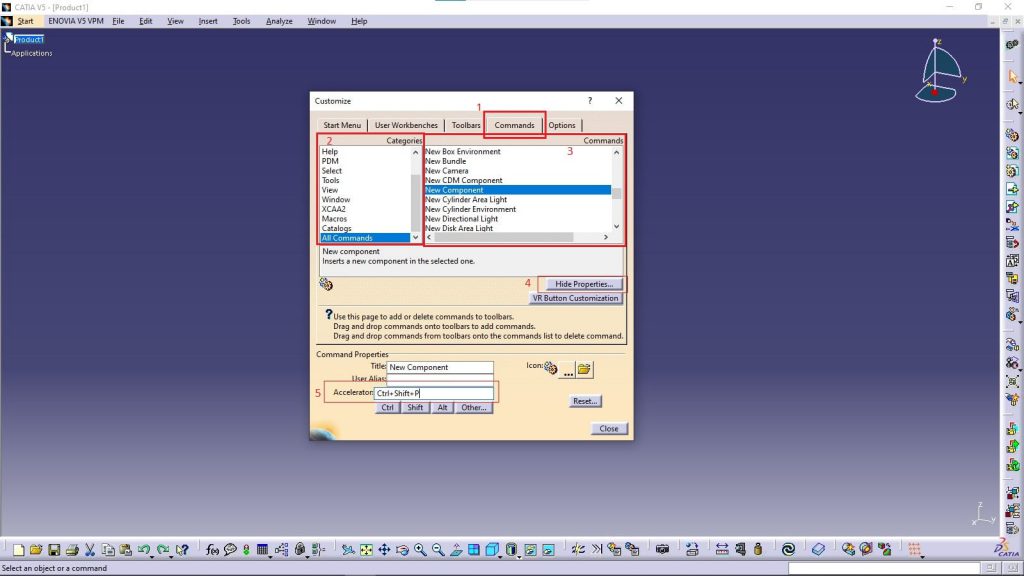
حال به عنوان نمونه یکی از این کلیدهای میانبر در کتیا را با هم فعال می کنیم. می خواهیم دکمه وارد کردن اجزا جدید New component را از ماژول Assembly تنظیم کنیم. با استفاده از مرحله قبلی، از مسیر Customize بر روی ستون Commands قرار گرفته و New component را پیدا می کنیم، یا با فشردن کلید N از جستجوی سریع استفاده می کنیم. نام فرمان (New component) را انتخاب کنید و دکمه Show Proprieties را فشار دهید. در ردیف Accelerator ترکیبی از کلیدهایی را که می خواهید استفاده کنید قرار دهید، در اینجا ترکیبی از دکمه های CTRL + ALT + P را انتخاب کردهایم.
روش دیگر انتخاب کلیدهای میانبر در کتیا
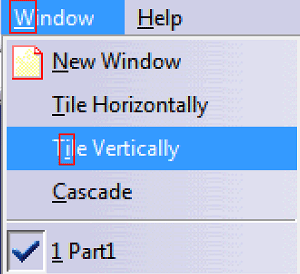
روش ساده دیگر برای استفاده از میانبرهای صفحه کلید در CATIA استفاده از صفحه کلید بدون تنظیم کلیدهای میانبر است. برای استفاده از این روش کافی است در هنگام باز کردنFile ، Edit ، View… با استفاده از فلش ماوس، حرف زیر دستوری که می خواهید انتخاب کنید را فشار دهید تا دستور فعال شود.
برای مثال بیشتر شما می خواهید (formula) فرمول را راه اندازی کنید، لازم است که با کلیک بر روی Tools کلیک کنید و بعد از آن با صفحه کلید F فرمول را فشار دهید. یک نکته جالب این است که شما می توانید از این روش برای باز کردن ددستتوورات دداخلی در هر سربرگ ننیز استفاده کنید مانند View -> Render style -> Perspective – بر روی View کلیک کنید و سپس Y و P را فشار دهید.
استفاده از این روش در ابتدا سخت به نظر می رسد ، اما در مدت زمان کوتاهی به یک اتوماسیون ذهنی تبدیل می شود.
مثال عملی برای کلیدهای میانبر در کتیا
با یک مثال واقعی در مورد اضافه کردن کلیدهای میانبر در کتیا با شما همراه هستیم. در این قسمت به ایجاد کلید میانبر برای دستور Hide/Show در کتیا می پردازیم. این دستور به کاربر اجازه میدهد که قسمت هایی از مدل را پنهان/نمایش دهد. در طراحی در بسیاری از موارد لزوم استفاده از دستور Hide/Show برای دید درست، طراحی مناسب و عملکرد دقیق بسیار الزامی می باشد.
در حالت معمول از دو مسیر برای استفاده از دستور Hide/Show میتوان اقدام کرد:
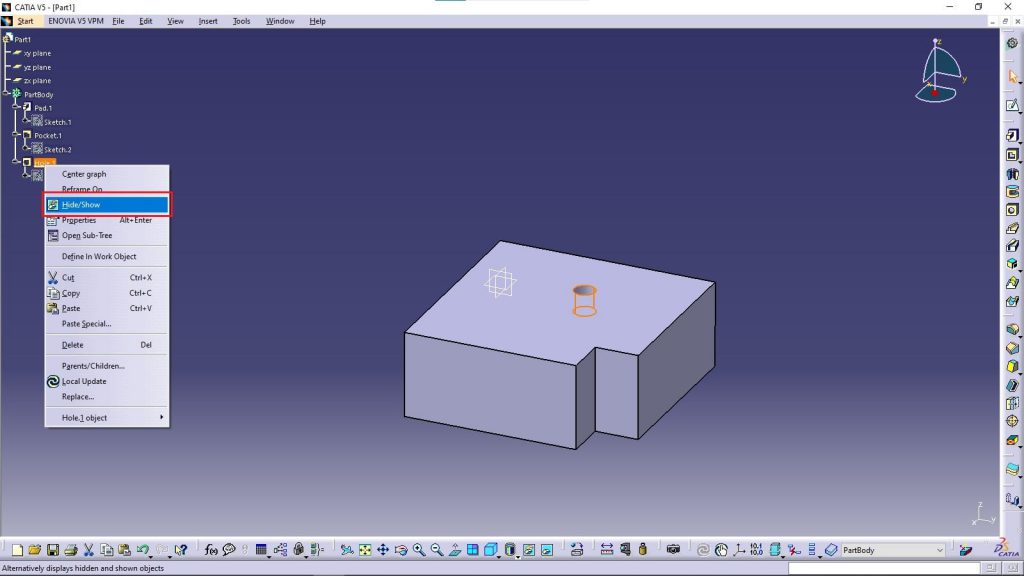
- بر روی شاخه درختی (نمودار درختی) از قسمتی که میخواهیم پنهان شود، راست کلیک کرده و گزینه Hide/Show را انتخاب کنیم.
- ابتدا از نمودار درختی المانی که باید پنهان شود را انتخاب مکنیم سپس از پنجره View دستور Hide/Show را انتخاب کنیم.
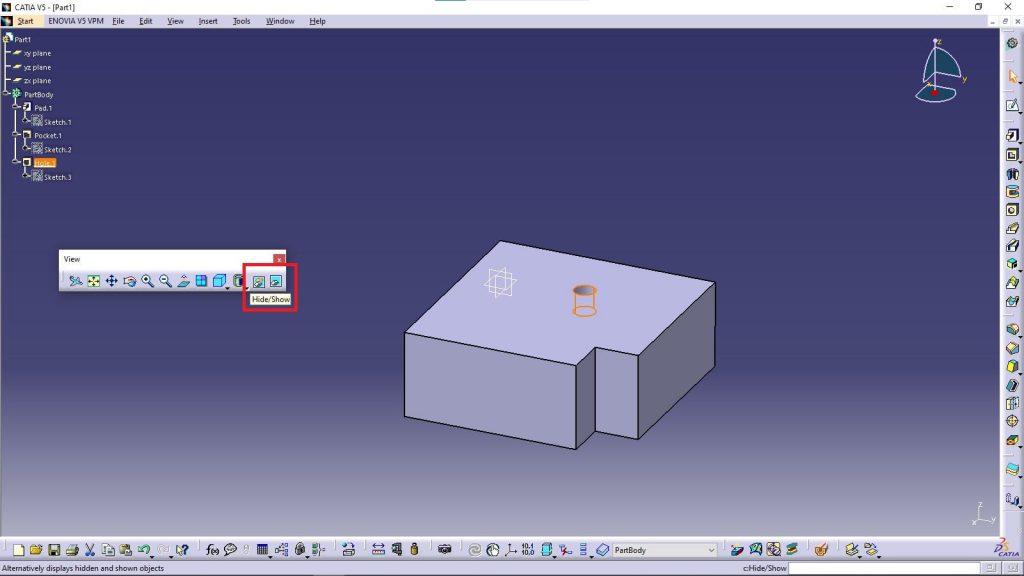
اختصاص کلید میانبر برای دستور Hide/Show
در یکی از محیط های فعال کتیا مانند محیط پارت دیزاین، از مسیر زیر Customize را فعال کرده:
Tools > Customize
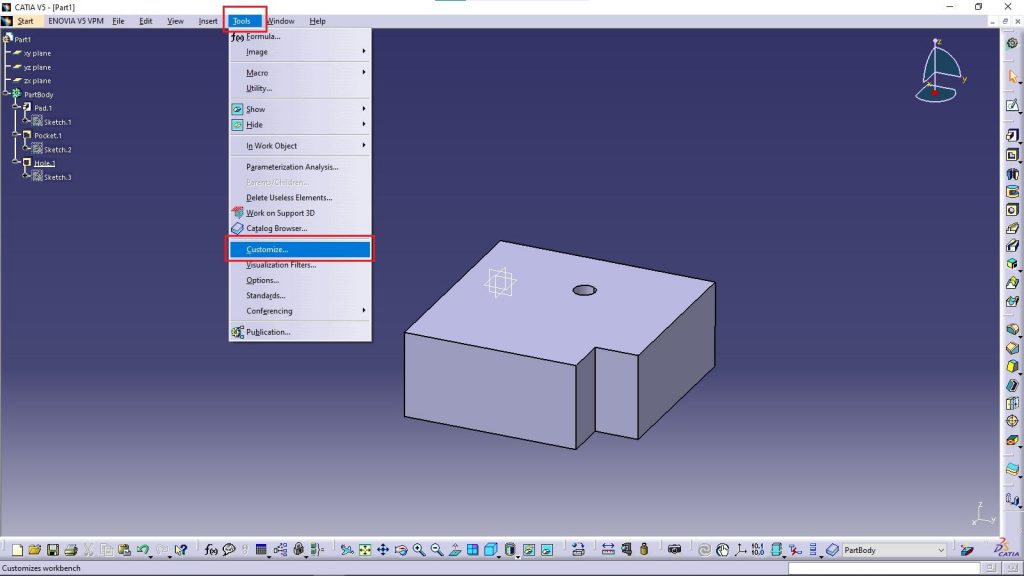
در پنجره باز شده Customize بر روی سربرگ Commands رفته و در ستون Categories بر روی گزینه به اسم View رفته و انتخاب میکنیم، سپس در ستون Commands دستور Hide/Show را پیدا کرده و انتخاب میکنیم.
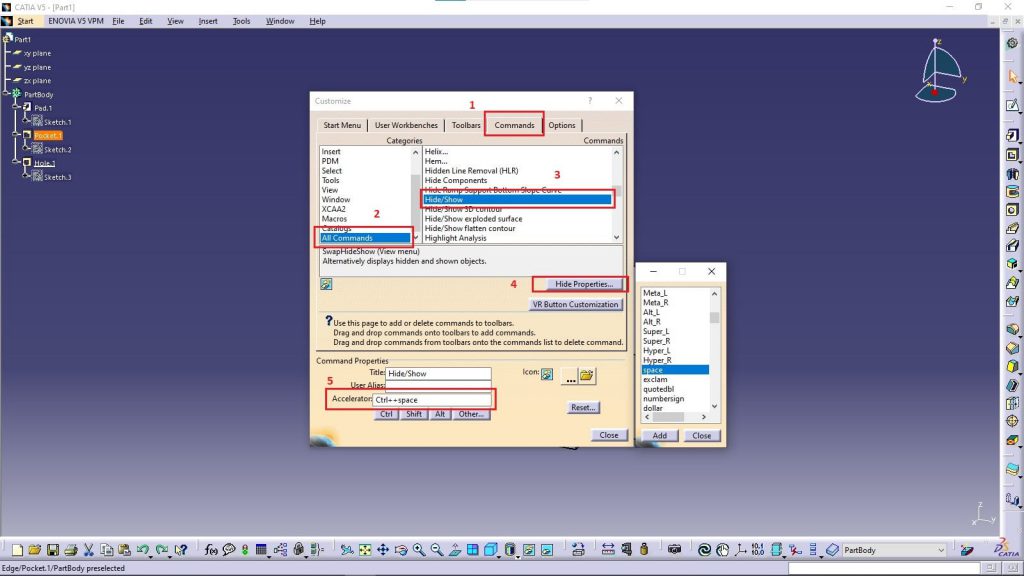
حالا از قسمت زیرین پنجره باز شده گزینه Show Properties را کلیک کرده و به صورت کشویی در قسمت زیرین چندین گزینه نمایش داده می شود.
اکنون در قسمت Accelerator میتوان ترکیبی از دکمه های مورد نیاز برای ایجاد کلیدهای میانبر را برای این دستور اضافه کنیم. در قسمت زیرین چندین دکمه برای راحتی کار به عنوان نمونه آورده شده است که شما ترکیبی از آنها را انتخاب کنید. همچنین با زدن دکمه Other میتوانید به لیست کامل دکمه ها دسترسی داشته باشید.
حال با بستن پنجره میتوانید از کلید تعریف ده به عنوان یکی از کلیدهای میانبر در کتیا استفاده و لذت را ببرید و به کارهای خود تسریع ببخشید.
لیست کلیدهای میانبر در کتیا
در جدول زیر لیستی از کلیدهای میانبر در کتیا را ایجاد کرده ایم. شما علاوه بر اینکه قابلیت ایجاد و شخصی سازی برای هر دستور را دارا می باشید، می توانید از این لیست پیش فرض در کتیا نیز استفاده کنید و از یک روش آسان برای صرفه جویی در وقت و تسریع طراحی بهره ببرید.
| کاربرد | دکمه |
| روند فعلی و دستور اجرایی را لغو کنید و از دستور خارج شوید | Esc |
| Help کتیا را باز کنید.(به صورت آنلاین یا آفلاین) | F1 |
| نمایش و پنهان کردن نمودار و ساختار درختی | F3 |
| Toggle Hide/Show | F9 |
| Toggle Swap Visible Space | F10 |
| نشان دادن توضیحات مختصر هر دستور | SHIFT – F1 |
| نمودار درختی را در یک پنجره جدید نشان میدهد به صورت بزرگ | SHIFT – F2 |
| برای فعال/غیرفعال کردن صفحات و Compass | SHIFT – F3 |
| چرخش به چپ | Shift+Arrow Left |
| چرخش به راست | Shift+Arrow Right |
| چرخش رو به بالا | SHIFT + UP |
| چرخش رو به پایین | SHIFT + down |
| فعال سازی قسمت ماکرونویسی | ALT + F8 |
| Visual basic editor | ALT + F11 |
| فعال سازی بزرگنمایی ساختار درختی و مدل | CTRL + PAGE UP |
| مدل یا درختی را که فعال است بزرگنمایی کنید | CTRL + PAGE DOWN |
| مدل را به سمت راست حرکت دهید(PAN right) | CTRL + RIGHT |
| مدل را به سمت چپ حرکت دهید (PAN left) | CTRL + LEFT |
| انقال مدل به بالا(PAN Up) | CTRL + TOP arrow |
| انتقال مدل به پایین(PAN Down) | CTRL + BOTTOM arrow |
| مدل را به دور محور z بچرخانید | CTRL + SHIFT + Right arrow |
| مدل را در حول محور z پاد ساعتگرد بچرخانید | CTRL + SHIFT + LEFT arrow |
| جابجایی بین پنجره های مختلف | CTRL + Tab |
| بالای نمودار را نمایش دهید | Home |
| پایین نمودار را نمایش دهید | End |
| نمودار 1/10 (یک دهم) یک صفحه را به بالا منتقل کنید | Up arrow |
| نمودار 1/10 (یک دهم) یک صفحه را به پایین منتقل کنید | Down arrow |
| نمودار 1/10 (یک دهم) صفحه را به سمت چپ تغییر مکان دهید | Left arrow |
| نمودار 1/10 (یک دهم) صفحه را در سمت راست تغییر مکان دهید | Right arrow |
| ویژگی ها | ALT + Enter |
| مدل را بچرخانید | ALT + SHIFT + Right arrow |
| مدل را بچرخانید | ALT + SHIFT + Left arrow |
| Go to Preselection Navigator | Ctrl+F11 |
| Activate fast multi-instantiation tool in assembly design workbench | Ctrl+D |
| Activate define multi-instantiation tool in assembly design workbench | Ctrl+E |
| باز کردن سند جدید | CTRL + N |
| باز کردن سند موجود | CTRL + O |
| ذخیره سند | CTRL + S |
| چاپ سند | CTRL + P |
| جستجو | CTRL + F |
| بروزرسانی | CTRL + U |
| برش (کات) | CTRL + X |
| درج کردن (پیست) | CTRL + V |
| انجام مجدد Redo | CTRL + Y |
| واگرد Undo | CTRL + Z |
بدون تنبلی و استفاده از هر دو دست می توانید سرعت و کارایی CATIA خود را بسیار افزایش دهید. یک دست می تواند با ماوس کار کند در حالی که دست دیگر می تواند از کلیدهای میانبر و میانبرهای صفحه کلید استفاده کند (به عنوان مثال: برای پنهان کردن و عدم نمایش).
کلیدهای میانبر در کتیا نسخه 6 یا V6 به صورت جدول زیر است:
| To… | Press… |
| Switch between the Fold and Unfold views. | Alt+F or Alt+U |
| View the parameters | Alt+S |
| Create Dxf file | Alt+D |
| Check overlapping | Alt+O |
| Minimize or maximize the Robot | Ctrl+M |
Standard Keyboard Shortcuts
These shortcuts are standard shortcuts.
| To… | Press… |
| Undo the last action | Ctrl+Z |
| Redo the last undo action | Ctrl+Y |
| Exit commands | Esc |
| Delete selected items from your document | Delete |
| Display the specification tree | F3 |
2. Specific Search Shortcuts for Work Instructions Planning
In the V6 database, you can search the work instruction references.
| To search for… | Use… |
| Alert work instruction references | wia |
| Data collect work instruction references | wid |
| Instruction work instruction references | wit |
| Sign off work instruction references | wis |
General Search Shortcuts
| To search for… | Use… |
| Catalogs | catalog |
| Parts | prt |
| PPR Contexts | ppr |
| Processes | prcs |
| Production operations | mope |
| Production systems | msys |
| Products | prd |
| Resources | rsc |
3. These shortcuts are specific to Bend Part Design.
Specific Keyboard Shortcuts
| To … | Press … |
| Activate the Building Slicer. | Ctrl+F8 |
| Activate the Building Estimator and see the elevation, area and volume of each story. | Shift+F8 |
| Change the stairs position of 90°. | Space Bar |
| Lock/specify dimensions while drawing. | Space Bar |
| Lock the smart grid to the current plane when pointing to a planar face before starting to draw (Draw on the grid). | Ctrl |
| Manage smart grid orientation before using Draw when pointing to an edge. | Shift |
| Align smart grid gridlines to the nearest edge before using Draw when underlying geometry is a planar face. | Shift |
| Turn off Snap-to-grid behavior while drawing (Draw). | Shift |
| Hide/show the Navigator tool. | F8 |
| Edit the clipboard. | F2 |
| Duplicate shapes and objects before making your selection via the Robot. | Ctrl |
| Switch between open profile tools (Line, Arc, etc.) while drawing. | Tab |
| Move the viewpoint forward during a walkthrough experience. | Up arrow |
| Move the viewpoint backward during a walkthrough experience. | Down arrow |
| Turn the viewpoint to the left during a walkthrough experience. | Left arrow |
| Turn the viewpoint to the right during a walkthrough experience. | Right arrow |
| Move the viewpoint forward at running speed during a walkthrough experience. | Ctrl+Up arrow |
| Move the viewpoint backward at running speed during a walkthrough experience. | Ctrl+Down arrow |
Standard Keyboard Shortcuts
| To … | Press … |
| Copy selected items to the Live Buildings clipboard | Ctrl+C |
| Paste the last item added to the Live Buildings clipboard into the current document | Ctrl+V |
| Remove selected items from your document and place them in the clipboard | Ctrl+X |
| Undo the last action | Ctrl+Z |
| Redo the last undo action | Ctrl+Y |
| Exit commands | Esc |
| Delete selected items from your document | Del |
| Display the tree | F3 |
Keyboard Shortcuts for Walkthrough Experience
| To… | Press… |
| Move forward | either Up, Z (on a AZERTY keyboard), or W (on a QWERTY keyboard) |
| Move backward | either Down or S |
| Turn left | either Left, Q (on a AZERTY keyboard), or A (on a QWERTY keyboard) |
| Turn right | either Right or D |
| Run forward | Ctrl+Up |
| Run backward | Ctrl+Down |
4. Keyboard shortcuts save you time when using Live Compose.
Specific Keyboard Shortcuts
| To … | Press… |
| Duplicate shapes and objects before making your selection via the Robot | Ctrl |
| Turn off the automatic recognition of geometrical relationships when moving 3D parts with the Robot. | Shift |
| Edit the clipboard | F2 |
| Add to my selection | Alt+B |
Standard Keyboard Shortcuts
| To … | Press… |
| Copy selected items to the clipboard.
The clipboard holds a maximum of 12 items. |
Ctrl+C |
| Paste the last item added to the clipboard into the current document | Ctrl+V |
| Remove selected items from your document and place them in the clipboard | Ctrl+X |
| Undo the last action | Ctrl+Z |
| Redo the last undo action | Ctrl+Y |
| Exit commands | Esc |
| Delete selected items from your document | Delete |
| Display the Tree | F3 |
5. Keyboard shortcuts save you time when using Live Shape.
Specific Keyboard Shortcuts
| To … | Press… |
| Switch between the three Robot planes to define the support plane before starting to draw (Draw on Grid ). | Left or Right Arrow |
| Lock the smart grid to the current plane when pointing to a planar face before starting to draw (Draw on Grid ). | Spacebar |
| Manage smart grid orientation before using Draw when pointing to an edge. | Shift |
| Turn off Snap-to-grid behavior while drawing (Draw). | Ctrl |
| Turn off automatic detection of geometric relationships while drawing (Draw ). | Shift |
| Switch between open profile tools (Line, Arc, etc.) while drawing | Tab |
| Reverse arc orientation while creating it (Draw > Arc) | Shift |
| Specify values (rectangle dimensions, circle and sphere radius, and line and cylinder length) when drawing or creating shapes. | Spacebar |
| Duplicate shapes and objects before making your selection via the Robot | Ctrl |
| Turn off the automatic recognition of geometrical relationships when moving 3D parts with the Robot. | Shift |
| Edit the clipboard | F2 |
| Add to my selection | Alt+B |
Standard Keyboard Shortcuts
| To … | Press… |
| Copy selected items to the clipboard.
The clipboard holds a maximum of 12 items. |
Ctrl+C |
| Paste the last item added to the clipboard into the current document | Ctrl+V |
| Remove selected items from your document and place them in the clipboard | Ctrl+X |
| Undo the last action | Ctrl+Z |
| Redo the last undo action | Ctrl+Y |
| Exit commands | Esc |
| Delete selected items from your document | Delete |
| Display the Tree | F3 |
6. Keyboard shortcuts save you time when using Natural Sketch.
| To… | Press… |
| Launch the View Render Style dialog box and choose between the Perspective and Parallel view type. | F2 |
| Launch the view selection and choose between front, top, bottom, left or right view. | F4 |
| Translate the plane in increments of 10 mm, or rotate the plane in increments of 15 deg, when manipulating the drawing plane (in the Select Plane or Symmetry command). | Shift |
| Force the translation in a single direction, when manipulating the drawing plane (in the Select Plane or Symmetry command). | Alt * |
| Activate Trace Over in order to refine the closest curve, when using the Pen or the Primitives command. | (and hold down) Alt. |
| Add newly selected elements to those already selected, when using the Transform command. | Ctrl |
| Translate the 3D manipulator in increments of 10 mm, or rotate the 3D manipulator in increments of 15 deg, when using the Transform command. | Shift |
| Activate Symmetry, when using the Transform command. | Alt * |
| Force the translation in a single direction, when using the Transform command. | Alt * |
| To snap the 3D manipulator onto the nearest canonical plane. | Double-click the manipulator plane. |
| * Can be used in combination with Shift. |
7. You can use a list of keyboard shortcuts to run commands more quickly.
| Use this key (or combination)… | To… |
| Escape | Exit the current dialog box (when there is one) |
| F1 | Get contextual online help |
| Shift + F1 | Get help on toolbar icons |
| Shift + F2 | Toggle the Tree overview on and off |
| F3 | Toggle Tree display on and off |
| Alt + F8 | Run macros |
| Shift + F3 | Activate the graph if the model is active and inversely |
| Home | Display the top of the graph |
| End | Display the bottom of the graph |
| Page Up | Relocate the graph one page up |
| Page Down | Relocate the graph one page down |
| Ctrl + Page Up | Zoom in the graph |
| Ctrl + Page Down | Zoom out the graph |
| Up arrow | Relocate the graph 1/10th (one tenth) of a page to the top |
| Down arrow | Relocate the graph 1/10th (one tenth) of a page to the bottom |
| Left arrow | Relocate the graph 1/10th (one tenth) of a page to the left |
| Right arrow | Relocate the graph 1/10th (one tenth) of a page to the right |
| Ctrl + Tab | Swap active document windows |
| Ctrl + A | Select all lines in a list (when multiselection is supported) |
| Alt + Enter | Run the Properties… command |
| Ctrl + C | Run the Copy command |
| Ctrl + F | Run the Find… command |
| Ctrl + G | Run the Selection Sets… command |
| Ctrl + N | Run the New… command |
| Ctrl + P | Run the Print… command |
| Ctrl + S | Run the Propagate… command with the user interface |
| Ctrl + Shift + S | Run the Propagate… command without the user interface |
| Ctrl + V | Run the Paste command |
| Ctrl + X | Run the Cut command |
| Ctrl + Y | Run the Redo command |
| Ctrl + Z | Run the Undo command |
8. The following is a table of keyboard shortcuts you can use to run commands more quickly.
| Use this key… | To… |
| Escape | Exit the current dialog box (when there is one) |
| F1 | Get contextual online help |
| Ctrl + Page Up | Zoom in the visual representations |
| Ctrl + Page Down | Zoom out the visual representations |
| Ctrl + Up Arrow | Translate the visual representations to the top |
| Ctrl + Down Arrow | Translate the visual representations to the bottom |
| Ctrl + Left Arrow | Translate the visual representations to the left |
| Ctrl + Right Arrow | Translate the visual representations to the right |
| Ctrl + Tab | Translate the visual representations one tenth of a page to the top |
9. Keyboard shortcuts save you time when using CATIA Live Rendering.
| To… | Press… |
| Start rendering your object. | Ctrl + Alt + R |
| Start rendering in batch mode. | Ctrl + Alt + B |
| Display the queue monitor for the rendering in batch mode. | Ctrl + Alt + Q |
| Open the material window. | Ctrl + Alt + M |
| Open the ambience window. | Ctrl + Alt + A |
| Create a camera. | Ctrl + Shift + C |
| Activate the camera viewpoints. | Ctrl + Alt + C |
| Modify the view angle. | Ctrl + Alt + V |
| Access the rendering options. | Ctrl + Alt + O |
| Suspend the rendering and displays a button in the middle of the screen. | Ctrl + Alt + P |
| Save the rendered image on disk. | Ctrl + Alt + D |
| Propage the rendered image. | Ctrl + Alt + S |
| Activate/Deactivate the gravitational effect. | Ctrl + Alt + G |
| Display the HUD information while rendering. | Ctrl + Alt + I |
| Display or hide the help panel. | Ctrl + Alt + H |
10. The following is a table of keyboard shortcuts you can use to run commands more quickly.
| Use this key… | To… |
| Escape | Exit the current dialog box (when there is one) |
| F1 | Get contextual online help |
| F3 | Toggle tree display on and off |
| F5 | Toggle object labels display on and off |
| Ctrl + Page Up | Zoom in the visual representations |
| Ctrl + Page Down | Zoom out the visual representations |
| Ctrl + Up Arrow | Translate the visual representations to the top |
| Ctrl + Down Arrow | Translate the visual representations to the bottom |
| Ctrl + Left Arrow | Translate the visual representations to the left |
| Ctrl + Right Arrow | Translate the visual representations to the right |
| Ctrl + Tab | Change between application windows opened in the session |
| Alt + Enter | Run the Properties… command |
| Alt + F8 | Adjust column size to full width |
| Ctrl + C | Run the Copy command (available only for textual information in dialog boxes) |
| Ctrl + V | Run the Paste command (available only for textual information in dialog boxes) |
| Ctrl + X | Run the Cut command (available only for textual information in dialog boxes) |
11. Here are some tips for a better use of the keyboard.
| Key | Command | Action |
| Shift | Activate, Remove (Pick or Brush), Split a Mesh or a Cloud | Deselects selected elements |
| Shift | Align using the robot | Moves the Robot without moving the cloud |
| Shift | 3D Curve | Activates/de-activates the Snap on elements option |
| Ctrl | Scan on Cloud | Previews the scan being created |
| Ctrl | Curve from Scans | Moves the split points |
| Ctrl | 3D Curve | Projects a point on its constraining element |





دیدگاهتان را بنویسید